 |
| My First Corn Shock Little Utah Farm 2012 |
shock 2
(sh k) k)
n.
1. A number of sheaves of grain stacked upright in a
field for drying.
2. A thick heavy mass: a shock of white hair.
tr.v. shocked, shock·ing, shocks
To gather (grain) into shocks.
[Middle English shok.] |
|
I had never heard this word,
shock. I thought the shocks were
called corn stacks. And
I was pleasantly surprised when I read about the original use of the corn shocks. Further investigation gave me old
stories about gathering the bundles of corn and tying them into
bundles to dry. Farmers fed the shocks to the cattle as fodder for
the winter and sometimes the shocks provided bedding against the cold
wet or snowy earth. Farmers waste no thing. Every part of the rural
life has a purpose and comes full circle. This is a part of living
off the land. The part that drew me to this kind of life.
How
to plant the corn 1-2-3
I
planted the little kernels of corn so carefully. I poked the holes with
a heavy iron spike. Just read the package. Some say to bury the seed ½ “and some 2”. It depends on what variety you have. I set the seeds 8” apart.
I dropped the dried kernels, into their holes and filled the earth
in over them. We had rented a rototiller and the clay was soft as cake
flour so my rows were easier to form this year.
I made my rows about 12-15 “ apart (just enough to step into) and 30 feet
long. There were 5 rows.
Corn
needs love:
You
must plant corn when the earth has warmed to at least 60 degrees. The soil
must have nutrients in it. Give your corn plenty of water as they
sprout and grow. Baby them, tell them they are beautiful, whisper
sweet nothings into their ears. Last year I got over a hundred cobs
piled high in the wheel barrel. I had a jolly time parboiling and
wrapping them up for the freezer. I shared some with my neighbors.
Oh those Peaches and Cream kernels were so sweet and delicious.
Here is my crop from this year 2015 in a greeting card. Perfect for Thanksgiving greetings. I loved this corn patch too. Every year has its own personality.

Our mild winter tricked me into planting in April. We had some deep freezes and the ground really didn't warm until the end of June. My crop looked small and uncared for. Much of it did not reach 3 1/2 feet high. But something wonderful did
emerge in my corn patch this year. I found some big fat worms at the end of the cobs to feed the hens and had enough good cobs for the hens to enjoy. Most of all I loved making my first corn shocks.
How
To Make Corn Shocks:
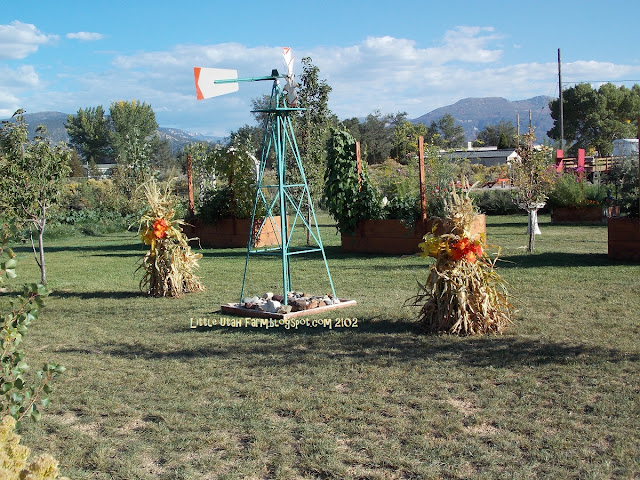
The stalks are usually sliced off near the ground with a scythe. I pulled my stalks from the ground and left on the root ball for weight to keep them from blowing away. These shocks will be decoration for our hay wagon in the Heritage and Livestock Parade in October.
You
will need:
cornstalks
(wait till the leaves on the bottom have turned brown and the tops
are still green)
cord
to tie with and scissors
a
tomato cage
some
decorations are nice like pretty autumn leaves, flowers ribbon or
dried corn
Instructions:
Set
the tomato cage on the ground upside down so the big part is on the
bottom.
Begin
placing the stalks one by one balancing them against the cage till
it is all covered (the ends of the stalks will flare outward on
the ground)
Tie
the shock in the upper third of the bundle with a cord ( I used
orange baling string )
I
left my tomato cage inside to assure a good structure as my stalks
were a bit flimsy. But if your stalks are strong you can slip the
whole shock off the cage and set it down.
Now
come more fun, Decorate!
70 years ago here's how it was
done:
Often the shocks sat out in the fields all year long, and the
farmer would use an ax to chop out the stocks he needed. That changed
in the late 1920′s when a picking machine was made and technology
began to really change things.
Farm Collector shares this story written by 70 year old Frances
Steel in 1970. “My father and I would take eight rows at a
time. I cut four rows and he cut four. He used a regular corn cutter
and I used a sickle, which I liked better. We used a wooden horse to
lean the corn together between the fourth and fifth row. The horse
was a pole about three inches in diameter at the big end and 12 feet
long. It was about two inches at the small end. It had two
broomsticks for legs at the big end and the small end rested on the
ground. And one and a half foot from the large end a hole the size of
a broomstick or handle was drilled and a broomstick inserted. This is
what the corn was leaned on to start the shock. And when we had cut a
space eight rows square, my father would tie the shock. With either
rye straw for a band, or binder twine, and as soon as it was tied, I
would pull out the broom stick and pull the horse ahead and we would
start a new shock. We mostly hauled the shocks in (onto) the barn
floor and husked on rainy days or in the evening by lantern light.
Major, my dog, would always be around. He loved to eat corn, and
there would be mice in the field under the shocks when we hauled them
in. And I saw him have a front foot on a mouse holding it down while
he killed another one, but (he) never ate one. One man is supposed to
cut 100 shocks a day. We never cut that many, and we did not lose any
time.”*
 |
| Little Utah Farm 2012 Corn Shocks |
Thank you for visiting Little Utah Farm as of October 2, 2015 we have (8,833 page views)
 |
Deborah Moen
of Little Utah Farm |


